DIY Burlap Message Board
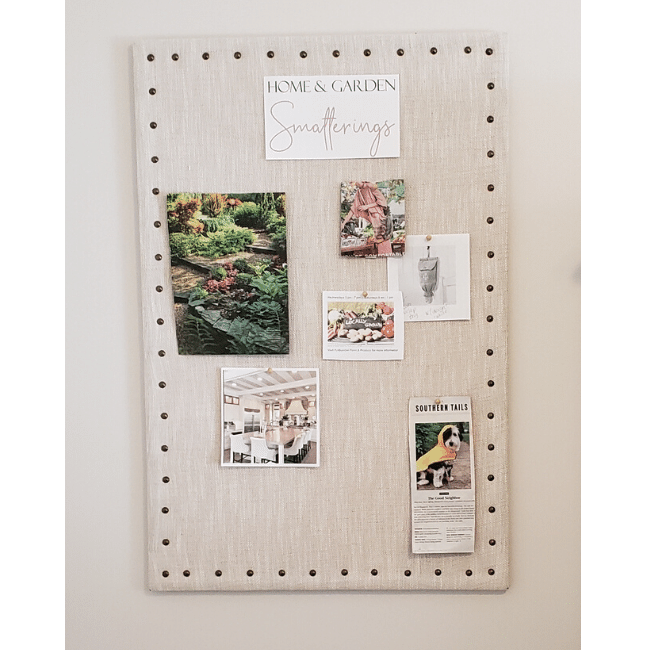
A few years ago I made a copy of those popular burlap message boards for the Home Office The project took less than two hours, only required a few simple tools and was a lot less expensive than buying one. This message board looks so good and a great addition to any work space. Read on for step by step instructions on how to make this DIY burlap message board.
Message Boards: A Great Home Office Organizational Tool
Message boards are a great tool for the home office. They allow for ideas, reminders, thoughts, and pictures to be posted out in the open. Inspiring, reminding, providing important reflection are just some of the benefits of having a message board to display these items.
Home Office Tool Doubles Becomes Home Office Decor
That said, a burlap covered message board can also be attractive and enhance a room's decor. Thereby, becoming home decor as well as a home office tool. The materials used to cover the board themselves create interest in the space. And when done right, an assortment of clippings, pictures, and notes can look attractive neatly placed on a burlap covered message board.
Materials Needed for Project
- 1 Cork Board with frame (see above links for reference)
- 1 piece of burlap or other open weave fabric at least12” wider and 12” longer than message board (This will allow for the needed 6” salvage on all sides.)
- Decorative upholstery tacks. I used 58 tacks for my 24” x 36” board
- Wire to hang the message board, if not included on board when purchased
Choose A Size of DIY Burlap Message Board
Before beginning, decide what size board to make. Consider the surrounding space. My board is a 24" x 36" metal framed cork board. Here's a slightly cheaper option: cork message board with a wood frame
Choose Material For Covering Message Board
Nest, choose the fabric. There are several options available in burlap. Another option; a a light, open weave fabric like I used. I used a $7 pair of curtain panels that I found on clearance. The color was perfect!
Word of caution, choose a weave that is tight enough to hide the cork board and frame, but not too tight that a pin will damage the fabric threadsz.
Choose Color and Style of Decorative Upholstery Tacks
Decorative upholstery tacks come in many styles and colors. Here's a sample board showing some different colors and styles.
Tools Needed for Project
- Scissors
- Screw driver
- Hot glue gun and hot glue sticks
- Two 4” x 8” pieces of cardboard (one for under the hot glue gun and the other to use as a pressing board to avoid burning fingers).
- Wire to hang the DIY burlap message board, thin enough to be able to fit under small frame screw
- Spacer template for upholstery tacks
Optional: tack hammer and small piece of scrap wood to protect working surface
Step One: Gather Tools & Prepare Work Area
Gather the required tools, place within reach of flat work surface. Plug in glue gun. (place on hot glue stand or piece of cardboard to protect working surface and make clean up easier.)
Step Two: Determine and Make Template for Decorative Tack Placement
Next, lay the DIY burlap message board face side up on flat surface. Taking exact measurements, measure the all four edges. Then calculate how far apart to evenly space the upholstery tacks all around the board.
Once distance between each tack has been calculated, make a template using the edge of an 8" x 11" piece of card stock. Now, double check the placement of decorative tacks. Are they even around the board? Using a pencil and the tack template, lightly mark message board where upholstery tacks are to be placed. Adjust where necessary.
Note: the distance between decorative tacks may not always come up even on all sides, adjust 2nd and next to last on that row. (See picture below for an example)

Step Three: Prepare for Placement of Hanging Wire
Next, if the cork message board purchased doesn’t have hooks for hanging it, let's address that here. So, remove a screw from each side of the top or upper side back edge of the metal frame. Set aside in safe place, we will use these later to attach a wire for hanging.

Unfortunately, I did a little damage to the fabric when removing the screw for this picture 🙁
Step Four: Attach Fabric to the DIY Burlap Message Board Frame
O.k., now that’s all the boring stuff is done we can begin the fun part. Lay fabric out, place message cork board in the center or so that to allow at least 6” salvage to all sides. Trim fabric to size. Fabric will be glued to the backside of the board and remaining edges folded under for a cleaner appearance. (See picture below)

Now the fabric is trimmed to size, begin pulling the fabric up and around edge to back side of the message board. Lay a 8” string of hot glue along the top center of the back of the frame.
Note: during this step we will only be gluing the fabric to the metal frame.
Without delay, press the fabric down firmly using precut piece of cardboard. Hold for a few seconds, or until hot glue hardens.
Next, do the same with the bottom center of frame being sure to pull the fabric taught, but not so tight as to distort the fabric on front side. Then, do the same to each side, again pulling fabric taught, but don’t distort the fabric.
Once the centers have been glued down, glue the top right side, then the opposite bottom left side. Repeat, working clockwise around back of message board avoiding the corners sections, they will be done last. Be sure to frequently check the fabric on front side doesn’t become distorted and that it remains flat but taught and even in appearance.
Step 5: Prepare Fabric for Hanging Wire
Before we move on to the corners of the DIY burlap message board, take a moment to locate the holes where we removed the screws in Step Three. Punch a small hole through the fabric, just the diameter of the screw through the fabric so we can add the hanging wire at the end.
Step 6: Mitering Fabric Corners
Miter cut the edges for neat looking corners. Lay a bead of hot glue on the back side corner of the frame. (See diagram below) Moving quickly and carefully, take the corner of the fabric, pull taught and then place over the bead of hot glue, press down and hold in place for 3 - 5 seconds. After the corner of fabric has been glued to corner of frame, trim off a triangle at the corner . (see diagram below). We will fold and glue the sides later.

Step Six: Finishing the Fabric on the Back of DIY Burlap Message Board
Now that the fabric has been glued in place on the frame, fold under edges and glue to the backside of the board, but again avoid doing the corners for now. Note: folded fabric should extend at least 2 – 3 inches beyond the inner edge of frame. This will provide protection against the decorative upholstery tacks tips that will most likely poke through the cork board. (see picture below)

Step Seven: Finishing the Fabric Corners
Finally, once the fabric has been turned under and glued, finish the corners. To do this, fold the sides under just enough so their edges meet when laid flat on the back side of frame. (see picture in Step Four for reference) Next glue the sides in place over piece of fabric covering tip of corner so corner is completely and neatly covered with fabric.
Step Eight: Placing Upholstery Tacks on DIY Burlap Message Board
Turn the board over and place each of the decorative upholstery tacks using template created earlier. I pushed the decorative upholstery tacks in with my thumb, but it did hurt after a while. A good alternative would be to move the board to the floor, take a scrap piece of 2 x 4 wood, place it under the frame and use a tack hammer to hammer upholstery tacks into place.
If the cork message board purchased came with hooks and wire, skip to the end and leave a comment! However, if the did not, move on to Step Nine.

Step Nine: Securing Hanging Wire Onto DIY Burlap Message Board
To easily add a hanging wire to a metal frame cork board is easy. All that's needed is to do is make a secure loop with a piece of thin, sturdy wire that’s about 8 inches longer than the width of the board (for hanging).
Insert screws half way back into DIY burlap message board frame. Next place loop of wire over one of the screws, carefully pulling the wire toward center, being careful to not displace the screw, but keeping loop under the head of the screw, finish screwing it in.
Once the first screw and loop of wire are successfully secured, take other end of wire, pull it around second screw, again keeping the wire under the head of the screw and pulling the wire towards the center of the board without displacing the screw, NOW, tighten the second screw. Confirm the wire is attached securely by slightly tugging on the wire.
Step Ten: Awesome DIY Burlap Message Board
So there there it is, a great looking burlap message board for a fraction of the cost to buy one.

Hope you enjoyed this post. Was it useful?
Before leaving, you might want to check out Updated Home Office and Make An Old Bookcase New and Beautiful.
--- please leave comment down below ---
I always prefer to read the quality content and this thing I found in you post. I am really thank full for you for this post.
Furniture & Accessories Categories
Thanks for the message. I appreciate your opinions. Stick to it. When I see this the content is fascinating. The reasoning is truly easy to understand
Pretty clear statement.-Very straightforward statement. Pretty cool. Very cool. The material is interesting when I see this. The reasoning is really simple to understand. I really admire your material here.
Need to value every one of your endeavors in this regard. Beneficial thing.- Good thing. Fortunately, I as of late accidentally found your blog. I got it later book-stamped! Many thanks to you for such a great amount for this detail. Much obliged to you. Much obliged to you. Much obliged to you.
That is an outstanding bit of guidance! I enjoyed this post. Nice!! Very honest and practical. Great post, can assist these tips! Thanks for the informative article! My dream job tip. Your article is very useful to prevent errors. your article improves.
Rug Fashion Store make it possible for you to complete any style with specially curated selection of home decor, including pillows, throws, wall mirrors, lighting, accent furniture and home accessories for sale online and in our Tulsa store. We also offer custom area rug and furniture options and offer interior design solutions ranging from one room to total home and office plans.