
How To Paint Beautiful Kitchen Cabinets In 9 Easy Steps
Are you looking to update your kitchen, but don't want to spend a lot of money? Have you been considering painting your kitchen cabinets, but were afraid to take on such a huge and difficult project? Today I'm going to share with you how to paint beautiful kitchen cabinets that have a smooth, durable, nick & chip resistant finish in 9 easy steps using one can of paint, a paint roller and a paint brush.With today's advancements in paint technology you no longer need to apply a separate primer and/or sealer, use expensive tools or nasty paint cleaners, and can eliminate most of the sanding and still end up with a beautiful and durable kitchen cabinet paint finish that looks like it was sprayed on. When you finish following these 9 easy steps your tired, outdated cabinets will look new again and have a beautiful, smooth finish. They'll be durable, nick and chip resistant and amazingly, you will have spent less than $45 for the essentials.
Watch Part 1 of the two part series "How To Paint, Beautiful, Chip Resistant Kitchen Cabinets in 9 Ridiculously Easy Steps - Part 1: Preparing the Kitchen Cabinets."
Look below for Part 2 of this video series.
Why Paint Kitchen Cabinets
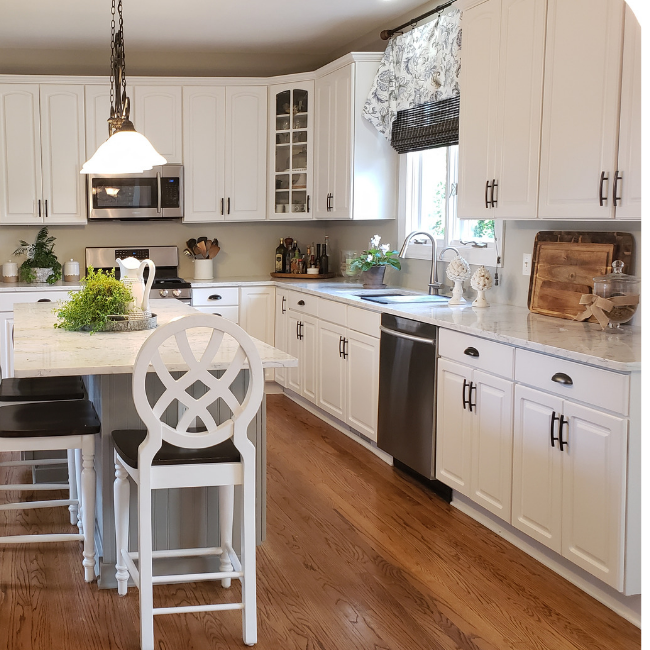
After time kitchen cabinets yellow and fade. Our kitchen cabinets are just over 20 years old and yellowed with age. They had some blemishes, but otherwise in good condition. So, instead of spending over $12,000 to replace our kitchen cabinets, I decided to repair the blemishes and paint the kitchen cabinets instead. The color I chose was Behr Irish Mist. The whole project cost me less than $60 for the paint, I already had the tools and most materials. It was really easy, and only took 4 days (that's including drying time.) They look great now, I'm so happy with the way turned out. They look new again and now the color matches our updated "Modern Traditional with hints of Farmhouse and Modern Industrial" home decor.
This Method Works Great on Painting Thermofoil Veneer Kitchen Cabinets
There are several different methods out there for painting kitchen cabinets. Most call for hours of pre-sanding, a couple of coats of primer and then sealing too. If painting thermofoil cabinets, some even suggest totally removing the thermofoil veneer first. Well, I have good news for thermofoil cabinet owners…I'm going to show you an easier and better way to paint your kitchen cabinets. A way that requires only a tiny bit of sanding, no primer and no sealer and no nasty oil-based mess. Yet, the finish is smooth, durable and most importantly, nick and chip resistant. This method works great on Thermofoil Veneer cabinets as well as wood cabinets.
You may notice in the pictures of our kitchen out island is a different color. That's because last year I painted the island and desk cabinets using a different color and different paint. The paint I'd used was a cabinet paint. I used it over a primer and also sealed it. Within months I noticed tiny nicks and chips, Especially where the barstools hit the cabinets. I have had to touch up those spots twice now. Not being thrilled with the finish of on kitchen island I explored other solutions for the other cabinets in our kitchen. Fortunately, I was keeping them a white color, but still I didn't wanted a more durable finish.
One Small Caveat; This Method Not Best Choice For Heavily Damaged Thermofoil Veneer Kitchen Cabinets
However, there is one small caveat; our kitchen cabinets had minimal cracks and blemishes. If you have thermofoil] cabinets with extensive damage or large areas of broken off, lose veneer you may want to consider using an alternative method. The reason, is that large areas of lose thermofoil veneer often means the veneer has lost its integrity and has begun to release from the MDF substrate core. Using plastic wood to fill in large areas will leave you with a kitchen cabinet finish that will be more prone to dents, nicks and chips.
One alternative method to painting heavily damaged Kitchen cabinets with thermofoil veneer is to completely remove the veneer, apply several coats of each primer, paint and sealer. But before you jump into a project like that be warned. Some have had good luck removing the veneer, others not so much. It was those "not so much" stories that kept me searching for a better and easier alternative.
If You have a Large Kitchen Consider Breaking Project Into Two Phases
Since our kitchen has a lot of cabinets, I broke this project down to two Parts. Part 1- Upper Kitchen Cabinets and Part 2 - Lower Kitchen Cabinets. This made the project more manageable and less disruptive to our lives.
Now, with all that said let’s dive right in. Here’s what you’ll need for this project:

| Alkyd paint | Disposable Gloves |
| 4” paint roller frame | Canvas drop cloth & old sheets |
| 4” smooth paint roller heads/covers | Plastic drop cloths |
| 2 ½ angled synthetic paint brush | Paint roller cup w/liners |
| 220 grit sandpaper | Small putty knives |
| 400 grit sandpaper | Plastic wood filler |
| Tack cloth | Paint key & stir sticks |
| Paint rags | 409 Brand cleaner & de-greaser or comparable |
STEP 1 - Prepare Work Area
- In a well, ventilated area cover the floor with plastic drop cloths. Anchor them down in corners. (I didn’t anchor mine enough and they blew around. A little annoying!)
- Set up enough tables to lay your doors and drawer fronts down. Then cover the tables with thin, non-lint fabric covers/drop cloths - like old sheets. They are more forgiving should a corner or edge should touch.
- Add some small items that will elevate the doors and drawer fronts at least a couple of inches for easier cleaning and painting. I used scrap wood pieces.
Note: After all the doors and drawer fronts were off, they were placed on the covered tables in the prepped work area. This way I could better determine what and how many pieces of scrap wood I needed to elevate the cabinet doors and drawers off of the table surface.
STEP 2 - Label and Remove Kitchen Cabinet Doors and Drawer Fronts
- Place each door and drawer front carefully to the side. When all have been removed, place them on the covered tables trying to keep them about 4 to 6 inches apart. This will help during cleaning, repairs and painting.
Note: If you have tall upper cabinets, you may want to recruit some help removing the upper cabinet doors. They are heavy and can tricky to hold in place with just one hand while unscrewing.
Note: Since I was painting a very similar color and my cabinets were in good shape, I decided not to paint the back sides of the doors and drawer fronts. And since the cabinets had European style hinges that fold out of the way of the edges of door, I left them on the door.
STEP 3 - Clean Cabinet Doors, Drawer Fronts, Cabinet Face and Sides, Toe Kick, Shoe Molding and Floor Next to Shoe Molding
- Clean doors and drawer fronts, cabinet face, sides, toe kick and shoe molding well using a good grease cutting cleaning agent with clean damp rags. My preferred cleaning agent is 409. It really gets rid of any grease and leaves very little residue.
- Wipe any residue off using both a damp and dry rags.
Note: If your cabinets are wood and have excessive grease, you may want to use a harsher cleaning agent like TSP. It’s nasty stuff and you need to take great care when using, but it will strip away the grease that may have soaked into the wood. However, removing residue from TSP will take more work. Plan on wiping with clean damp rags at least 3 times. The best way to tell if you’ve removed all the residue from the TSP is to run a smooth dark cloth over the surface, you no longer see light colored dust.
STEP 4 - Make Repairs
- Carefully remove any small area of veneer that won’t lay flat onto MDF substrate (or core) using a sharp utility knife. If you have large areas of missing or damaged veneer please read the above section noting caveat.
- Glue any lose or broken piece of veneer in place using a strong, tacky, permanent adhesive such as E6000. Immediately remove any excess adhesive using a rag or paper towel. When gluing tight spots like the edges, I gently pulled the lose veneer away and applied adhesive in the opening with a toothpick. Then I pressed it firmly in place making sure it's well adhered to MDF substrate, or core. Allow glue 20 minutes for adhesive to dry.
- Fill in cracks, breaks and damaged areas with plastic wood filler. Using a small putty knife or a finger for rounded areas take small amounts and press and level with surrounding veneer.
- Sand any areas filled with plastic wood filler using 220 than 400 grit sand paper. Some areas may require a second round of filling and sanding. It’s worth the effort of filling in everything and sand it all smooth. After a couple coats of paint those cracks, breaks and blemishes all disappear making your cabinets look new.
- Wipe anything that's been repaired with a slightly, damp rag.
- When everything (doors, drawer fronts, cabinet face and sides, toe kick and shoe molding) has been cleaned and repaired wipe it all down with tack cloth. This will remove any remaining particles from dust or what-have-you.
Woo Whooo!!! Prep Work Finished
Prep work is now done and the kitchen cabinets are ready to paint. Yay, I love painting; such “immediate gratification”.
STEP 5 - Painting First Coat Onto The Kitchen Cabinets
- First things first…put on a pair of disposable gloves. (This paint has great adhesion properties and will adhere itself to your skin as well as your cabinets.)
- Using Behr Alkyd semi-gloss, stir paint well, pour about a quart of it into the roller cup. Wipe rim of paint can well, replace lid snugly. NOTE: Paint dries quickly, close can when not in use.
- Using your 4” roller with smooth finish roller head begin rolling on the first coat of paint. This is a thick paint; but doesn’t cover great. The objective when applying this first coat is to apply a thin coat evenly and to make sure not to leave drips of clumps of paint.
- After rolling on the paint, take your 2-1/2” angled synthetic paint brush (Purdy brand or HD Wooster Pro preferred) and lightly load it with paint. Now taking long, light strokes from top to bottom (side to side for drawer fronts) then sides, very lightly brush the entire surface – try not brushing over an area more than just once. You are just smoothing and evening out the paint a bit and catching drips and clumps or glops or puddles. Watch edges closely as that’s were most of you drips and puddles will occur. Don’t worry about any brush strokes left in the paint, they will level out as the paint dries. Rest assured this paint does have good leveling properties. I just found lightly brushing after rolling gives the smoothest finished surface. So, I say, why mess with with a good thing.
NOTE: If you are seeing several drips and clumps, load paint roller & paint brush with less paint.
PAINTING PANELED DOORS AND DRAWER FRONTS:
If painting paneled doors and/or drawer fronts paint as above, beginning in the raised center panel then the inset area surrounding the panel, then the outer flat surface of door and finally the outer edges and sides. (SEE DIAGRAM) The trick here is to smooth out each of these portions with a lightly loaded paint brush before continuing to the next, then blending in the edges as you apply the following portions. Watch closely, the inset areas and edges for clumps and drips as this is where most of them occur. Also, after finishing one door or drawer, double check the previous for any drips or clumps that may have formed and lightly brush them out with the paint brush, using very light stokes.

Follow the diagram when painting kitchen cabinet door to ensure a smooth finish.
STEP 6 - Dry, Sand and Wipe Down Kitchen Cabinets
- Let the paint dry for about 24 hours.
- Then using a piece of 400 grit sandpaper in your hand or wrapped around a soft sanding block, quickly and very lightly sand the painted surfaces. If you find any drips or puddles they will need to be sanded out now. Don’t worry too much about the insets and edges, unless you find drips or clumps in them. Otherwise, just lightly swipe through them with an index finger inside a piece of 400 grit sandpaper. The objective here is to just sand off any tiny particles that may have attached themselves during the drying process and to correct any drips or puddles that were missed earlier. The surface should feel smooth when you run your hand over it.
- After all is sanded, wipe everything down using tack cloth.
STEP 7 - Repeat Steps 5 & 6
STEP 8 - Repeat Steps 5 & 6
THIS STEP IS ONLY NEEDED if you’re are dramatically changing the color of your thermofoil veneer cabinets or if your cabinets are wood or wood veneer cabinets. The Behr Alkyd paint is not great when it comes to coverage. However, it does excel on all other points: adhesion, durability, fast drying and leveling. So, in my mind a small price to pay and definitely worth painting on the one additional coat.
STEP 9 - Re-install Kitchen Cabinet Doors, Door Handles/Knobs, Drawer Fronts, Drawer Front handles
NOTE: If you have tall upper cabinets, find someone to help you re-install the upper cabinet doors. They are heavy and a little tricky, re-installing them is much easier with two people. •
- Place each of the doors in front of cabinet where they belong and drawer fronts on counter above the drawers where they belong. This will help re-install phase go faster.
- Screw the fronts onto the drawers, then the drawer handles. Do this until all drawer fronts and drawer handles have been re-installed.
- Re-install cabinet doors. Start with attaching the handle/knob back onto door. Then re-install cabinet doors by holding onto the door with your non-dominant hand and screwing in hinges with your dominant hand. Firmly holding door in place, starting with top hinge seat (screw in most of the way) each screw. Still firmly holding door in place, do the same for remaining hinges on door. When all screws are seated, and door is in proper position, tighten hinges. (If your hinges have elongated holes for the screws, place the adjust door so screws are in the center of the elongated holes.)
- Adjust the doors, so bottoms and tops are even and the open space between any two doors is even.
NOTE: If you have European hinges, this step takes some time. I found that if I adjust the bottom hinge to close the gap between two doors that had an opening, it would raise the door a bit, causing the top and bottom alignment to go out. So, when closing a gap like that, split the difference between the two doors instead of making all the adjustment on one door. One other piece of advice, when re-installing doors on a bay or line of cabinets, start at one end aligning the doors with one another you work towards the other end.

I'm really happy how our kitchen cabinets turned out and for so little cost.
Curing Time for Newly Painted Kitchen Cabinets
Paint can take up to a month to cure, or reach maximum hardness. Alkyd paint dries a bit faster, but to be safe avoid bumping your newly painted kitchen cabinets with hard objects like barstools for at least 3-4 weeks. You may want to ask the fam not to wear shoes in the kitchen until the cabinets are completely cured. Shoes kicking against the shoe molding or knocking against the cabinets under an island area when sitting at a bar stool for instance can cause unsightly nicks in your beautiful, new finish.
Project Completed
So that's all there's to it! For very little money and a reasonable amount of time and effort, you now have updated, beautiful kitchen cabinets that are durable and nick and chip resistant. I just love how Kitchen cabinets make such a big impact on updating a kitchen?
If you like this post and would like to be notified when new posts are added, please subscribe.

Hard to see in the pic, the finish on our old kitchen cabinets had yellowed. Now the are a soft white with slight gray tone.
Your Thoughts & Comments
I know I get excited about home projects a bit more than most. I will see something that inspires me, than become obsessed with it. This works for me, because it pushes me to find the best means and methods to achieve success with a project. Anyway, sometimes my excitement gets the better of me and I miss what others find inspiring. So, I was wondering, did this post inspire you? Did you find the two short videos helpful? I'd really love to hear your thoughts!