
White Distressed Coffee Table – 5 EASY Steps + Video
Do you have a coffee table that you'd like to update? Want to learn how to paint a white distressed coffee table in 5 easy steps? In this post I show you step by step, how to achieve a chalk paint white distress finish, I share with you supplies needed, resources and useful tips. By the end of this post, you will be able to transform and update just about any wooden coffee table using this white distressed chalk paint technique.
Why a White Distressed Technique
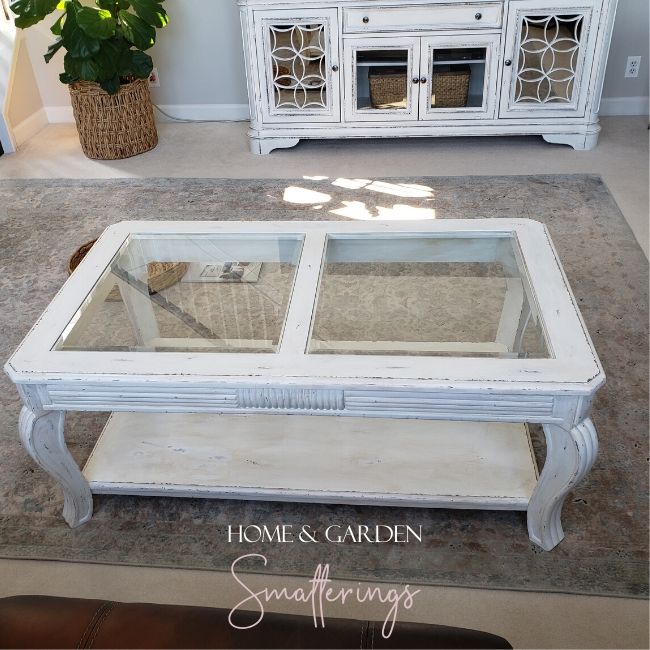
The white distressed chalk paint technique I used on this coffee table is a technique I created in an effort to match a white distressed T.V. console cabinet I purchased for my family room. You may notice in the above picture, the top of the console cabinet has a dark gray weathered finish. Instead of a gray top on the coffee table, I chose to paint the entire table a distressed white. The reason for this is that the coffee table is going to be placed next to a large dark brown leather sectional. To keep balance in the room, the color of the coffee table needed to be light so as to offset the large dark sectional.

clean surface before painting
The Coffee Table: A $15 Find
Since renovating the room quite some months ago, there's not been a coffee table in our family room. The room was certainly large enough for one. However, with plans to down size in a few years, buying a new coffee table wasn't a smart option.
So instead, I kept and eye out for used furniture. A few weeks ago I found this coffee table for only $15. The coffee table is solid wood, the right size, in very good condition and has some detail that is similar to the T.V. console cabinet. I knew when I saw it that with the right paint I could make the table work with our modern French country farmhouse style.
Ways to Save Money Buying Chalk Paint?
To save considerable money on chalk paint, plan ahead and use coupons. I have used chalk paint from the big box stores with great success on several projects now. To be honest, I haven't tried the expensive brands. With the level of success I've achieved with the less expensive brands, there's not been a need to check them out. Anyway, use store coupons if shopping at the big box craft stores. Otherwise, you can typically find low prices on chalk paint at Amazon and Walmart. More on the chalk paint I used for this project, down below.

chalk paint and wax for white distressed finish
Why Use Chalk Paint?
The reason to use chalk paint is because it has such superior adhesion properties. What this means is you don't have to strip your furniture down to bare wood before painting to prevent the paint peeling and chipping. Chalk paint will even adhere to varnish. However, you do need to thoroughly clean and remove any grease or grime before you begin painting. I will cover how to clean your piece in Step 1 of the white distressed coffee table - 5 easy steps.
Questions About White Distressed Coffee Table - 5 Easy Steps?
Sometimes, it's easy to forget that what may seam intuitive to me, is not always so intuitive to others. So, if you have a question about this painting technique and can't seem to find the answers, please ask by putting your question in the comment section below. I will try and respond quickly. By doing this, we can help others that have the same or similar question(s).

Supplies You Will Need For This Project
- 8 oz bottle of Restore #ADC35 Chalky Finish Paint from DecoArt
- 8 oz bottle of Carbon #ADC29 Chalky Finish Paint from DecoArt
- 16 oz bottle of White Adirondack #34846 Chalk Paint from FolkArt Home Décor
- 16 oz bottle of Clear Wax #34863 Wax from FolkArt Home Décor
- 4 Small plastic containers for paint and wax
- Short Angled paint brush with soft, flexible handle
- 2" Wax & Finishing Brush
- Large wood rasp - used for distressing
- Small wood rasp with chisel tip - used for distressing
- Large vinyl covered hook with wood screw end (as shown above) - used for distressing
- Large painting tarp
- Plastic tarps (if additional protection to surrounding areas is needed)
- Damp towel/rag
- Large pieces of old white t-shirt - used for buffing
- Microfiber towel - used for final buffing
A Few Words
A few words I want to mention before we start painting a white distressed coffee table in 5 easy steps:
First, to help you with this project, I have provided a short video, How to Paint a White Distressed Coffee Table in 5 Easy Steps. You can find the video at the bottom of this post. The video shows step by step how I transformed an outdated coffee table into a coffee table that now fits in with our home's modern French Farmhouse decor. I believe you'll find the video useful and informative.
Second, you'll want to be sure to read through each of the steps below, as these steps contain additional detail and useful tips that I wasn't able to fit into the short video.
WATCH COFFEE TABLE MAKEOVER VIDEO
STEP 1 – Clean the surface
Clean surface well with a degreaser such as Formula 409 and heavily damp towel/rag with rough nap. Then remove any remaining cleaning residue with a damp cloth. Wire brush crevasses on areas with built up wax or varnish. The edges on the top of the coffee table I was working on had quite a lot of varnish. So, since I wanted a sharp edge, I used a large wire brush to remove it. To finish, wipe the table clean with slightly damp microfiber cloth.

STEP 2 – Applying Base Coats
Using the small handled brush apply two base coats as follows:
Start with the first base coat of chalk paint. this will be in a color you want to show through after distressing. I used chalk paint color called “restore” #ADC35 from DecoArt slightly thinned.
To thin your chalk paint, use a small disposable bowl or container to mix in a little water. I used a ratio of approximately a 1-part water to 10-12 parts paint. You want this coat to cover completely. So, you want to only thin the chalk paint enough to apply the paint evenly. Allow to dry to touch, about 20-30 minutes.
Next, add the second coat of base to add some dimension by using a contrasting color, For my coffee table I used chalk paint color called “carbon” #ADC29 from DecoArt heavily thinned.
Thin your chalk paint as above with the first base coat color. But, this time use 1 part water to only 5 parts paint for a thinner coat. I applied very sparingly with light, feathered strokes. I could have applied a this color less sparingly for a more distressed look. However, my goal was to make the coffee table look like our T,V.console. Allow to dry to touch, about 20-30 minutes

first base coat

second base coat
STEP 3 – Apply Top Color
To achieve a white distressed finish like the one used on our T.V. Console cabinet I needed to find a white that didn't have any noticeable yellow, yet was still warm. I found the appearance of yellow gave a vintage shabby chic look. Although I'm not opposed to shabby chic decor, my home is decorated in a more Modern French Farmhouse style.
The best chalk paint I found for this project was the white Adirondack #34846 from FolkArt Home Décor line. I did thin this chalk paint down a bit as I did with the first base coat of 1 part water to 10 parts paint. I did so, simply for a cleaner, smoother finish. Allow to dry to touch, about 20-30 minutes
Next, I applied a second coat of white top color. I did the second coat of top color the same as I had done the first coat of top color. Once again, allow to dry to touch, about 20-30 minutes.

top coat
STEP 4 – Doing a Bang-Up Job
Now, to make this coffee table match the television console, I needed to make some serious distressed marks. I used three different tools: a large vinyl covered hook that had a screw end, a large flat wood rasp and a smaller wood rasp with a chisel style tip.
For a better distressed look, make your marks random by hitting the table from different angles.
First, I started by using the large vinyl covered hook that had a large screw end. With this hook I was able to make the large gouges I needed to reveal the base coat color. I repeatedly hit the edges of the table from different angles and with considerable force. Then dragging the screw end of the large hook against the grain of the wood. To make sure the distress marks looked random, you should take a step back often to review your work. The important thing here, I believe, is to make sure your marks are random and aren't forming a pattern.
Next, I used a large wood rasp to file through to the base coat on the edges of the top and the legs. Again, keeping my strokes and pressure erratic to achieve the aged look I was going for.
And finally, I used the chisel tip of my small wood rasp to create largish areas that appeared wear the paint had worn off. I did this effect by using first light pressure, then concentrating in the center-ish with more pressure. Once you have created the distress look you want, give the table a good wipe down with a clean cloth.

closer look at distressing
STEP 5 – Applying Wax Finish
Wanting to add a little more color I mixed a couple of drops of brown wax to my clear wax. Using a round waxing/finishing brush in a circular motion, I applied the wax to the sides and legs. Then with my flat, little flexible brush I applied a coat of this wax to the top. I also used the little flat brush to catch any drips on the sides and legs. I let the wax dry 8 hours or overnight. Then buff with a slightly damp t-shirt until the surface is fairly smooth.
As it turned out, I didn't care for the darkened wax coat. So, I used a wet towel with lots of pressure to remove the 1st coat of wax with the touch of brown. It was quite an arm workout!
Then buffed the surface smooth what little wax that was left. Removing and buffing out that first coat was definitely the hardest part of the whole project. However, I'm really glad I did. Because, what I found was that if I rubbed hard the white paint hard enough, I was able to thin out the white top coats around the chiseled distressed marks. The thinned white paint look added to the overall distressed appearance of the table.
I have always believed distressed and faux paint finishes are not about perfection. It's about imitating nature, going with the flow, taking your time and constantly stepping back to assess your work.
Had I heeded my own advice I wouldn't have been in such a hurry. I would have stepped back and notice the yellowish appearance of the wax and stopped myself long before adding the entire first coat of wax with color and then also letting it dry overnight. Ugh!
Fortunately, chalk paint and wax are forgiving and I was able to walk it back to a nice white distressed finish that I could now add a couple coats of clear wax to finish the project.
So, I then I applied the two thin coats of clear wax. First, applying one thin coat, allowed it to dry 8 hours, then buffed it smooth with a piece of clean white t-shirt. Next, I applied the second coat of wax just the same as I had done the first coat of was. When the second coat of was was dry I buffed it smooth with the white t-shirt than I further buffed the was to bit of a satin sheen.

So, what do you think of the old discarded coffee table update with a white distressed chalk paint finish. I like how the white distressed finish now matches the t.v. console and fits in with the Modern French Farmhouse Decor in our home.
What do you think? Have you tried this distressing technique? If so, please share in the comments below.