
DIY Heart Rag Wreath Tutorial
Learn to make a gorgeous DIY heart rag wreath. This rag wreath will look great in just about any style home decor. But, especially looks great in either Rustic French Country or Farmhouse home decor. These rag wreaths are quick, easy and cheap to make. Below I'll walk through the steps on how to make this DIY heart rag wreath as well as provide a quick tutorial towards the end.
A "Squirrel" Moment Becomes Inspiration
Several months ago I was browsing through Pinterest for Halloween craft ideas. That's when I first noticed heart shaped rag wreaths. "Squirrel!" I fell in love with them and they looked like a great way to use up some of the muslin I had laying around in my craft studio. So, I saved the pins and went back to my original purpose.
Jump to Heart Rag Wreath Tutorial Video
Fast Forward to Late January
Now fast forward to a few weeks ago. February was fast approaching and Valentine's Day around the corner. I thought I'd try my hand at making one of those heart shaped rag wreaths. As much as I loved the other wreaths; they didn't really fit with my rustic French country home decor. So, I purchased some white cotton muslin fabric and ivory chenille yarn.
So Much for Using the Muslin in My Studio
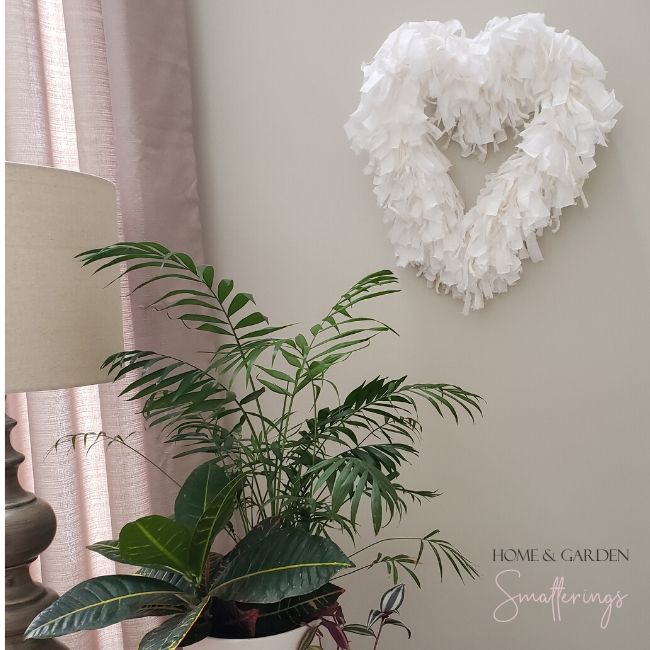
What about the the muslin in my craft studio? Well, the muslin I have in my studio is unbleached. It's too yellow, too Shabby Chic. Oh well 🙁 I am glad I used the white fabric instead. I love how my rag wreath turned out. This heart rag wreath goes well with the rustic French country style in my house.

Heart Rag Wreath Materials List
- white coat hanger
- 2-1/2 yards of white cotton muslin
- 1 yard chenille yarn in ivory
Heart Rag Wreath Tools You Need
- large wire cutters
- flat head pliers
Optional: Leather or heavy pair of gloves.
Shaping the coat hanger takes some work and can be pretty hard on your hands. I encourage wearing a pair of leather or heavy gloves.
Watch Rag Wreath Tutorial
Step 1 - Shaping the Wire for Heart Rag Wreath
Begin by pulling down on the center bottom of the hanger while holding on to the top center. Pull down as if you are forming a circle. In other words, don't pull it all the way down to form the point of the heart. We'll do that in a few moments.
HINT: If you have gloves, you'll want to put them on now.
Next, using your hands work the side corners until they are rounded and you have a circle. Use the flat pair of pliers to help round the corners of the hanger wire. Keep working the wire until you have a full circle.
Make the top of the hanger rounded too. Working the top part, just under where the wire twists on the hanger, straighten out those little corners to make a fuller circle.
HINT: Don't worry, your circle doesn't need to be a perfect circle.

Now let's make the bottom point of the heart. To do this, pull the center bottom of the hanger. Pull down only enough to start creating the point. You don't want to make the top of your heart a point too.
Once the point begins to take shape, wrap your hands around each side and pull in to give the point more definition.
With that done, you should be able to grab both sides of the forming point in one hand. Give your hand a good squeeze to create a 45 degree angle. Note: the wire doesn't need to be bent to a sharp point.
NOTE: This next part is easy, but can be a bit tricky.
While holding the bottom point with the shape facing you, pull the top center as if you were forming an oval shape at the top. Now pull the wire forward, towards you and then down. This will turn the wire and require some work. To make the heart shape lay flat, push the top backward beyond the plane of the sides.
Finish shaping the heart rag wreath until you have it just the way you want. Then using the large wire cutters, cut off the hoop shape.

Step 2 - Making the Fabric Strips
This part of making the rag wreath is super easy and fast. Start by folding your 2-1/2 yards of cotton fabric lengthwise. First fold it in 1/2 lengthwise, and then in 1/2 once again. Cut a 2 inch slit into one end of each of the folds.
NOTE: If using a standard 45 in wide fabric, you should have four layers of fabric, each approximately 11-1/4 inches wide.
Now, rip the fabric beginning at each of the three slits, then all the way down to the opposing end. You should now have an 11-1/4 inch wide x 2-1/2 yards long piece of fabric. Do the same with remaining two slits, until you have four 11-1/4 inch wide x 2-1/2 yard lengths of fabric.
Next, cut slits for the small fabric strips. To do this, take one of the 11-1/4 inch wide x 2-1/2 yards piece of fabric and fold a couple of times width-wise. Cut 2 inch slits into one of the sides of fabric every 1/2 to 3/4 or so inches.
HINT: For a rag wreath with more texture and interest, make the strips random widths between 1/2 inch and 3/4" or so.
Check out above picture to use as an example. See that there's no precision needed here. Have fun with it. When done making the slits, set the piece to the side and do same for remaining three lengths of fabric.
Unfold each of the four lengths of fabric with slits cut into the side. Starting at one end, begin ripping strips of fabric off where you've made your slits. Do this with remaining three lengths of fabric. To keep the straggling, loose fabric thread under control, gently pull loose threads off as you lay the strips down in a pile. I had quite a large ball of thread when I finished making my heart rag wreath.

Step 3 - Cut Chenille Yarn Pieces
Next, cut the chenille yarn pieces into 11 or so inch pieces. Again, a little randomness is good and creates texture and interest to your rag wreath. Set the pile of yarn next to your pile of ripped cotton strips.
When I made my wreath I put the yarn on last. However, I found doing it this way was more work. I had to finger in each of the pieces of yarn, which was more difficult after the wreath was full. I think adding the yarn while adding the fabric strips is a better idea. Let me know what you think by leaving a comment below.

Step 4 - Putting Rag Wreath Together
Now, add strips of cotton fabric to heart shaped coat hanger. To do this, simply fold a fabric strip in half, wrap looped end over wire and the tails of the strip around the wire and back through the loop. See above picture for example. Pull the tails tight to secure strip of fabric to wire. Slide strips of fabric on the wire to fit snug against each other. Randomly add strips by themselves and in groups of two and a few groups of three strips.

Then, every 3/4 inches or so tie on a piece of chenille yarn. Below is a picture to show you what the back you rag wreath should like.

Step 5 - Your Heart Rag Wreath; Finishing Touches
To make a hook to hang your wreath, take two tails from the top center (near the inverted point) and tie a know about 3/4 inches from the wire. Trim off the ends.
Fluff up the strips of cotton and yarn by running your fingers gently through them like you would your hair. Gently pull out lose and straggling threads as you come across them. Then hold rag wreath in front of you at arms distance, shake a little and take a final look for loose, hanging threads that need to be trimmed off.
Hint: If you hold the heart wreath by the frame in the back, you'll avoid scrunching the parts you just fluffed.

How do you like your heart shaped rag wreath? Did you make yours with with cotton fabric and ivory chenille yarn or something different? Is your wreath for everyday or do you make it for a special occasion? If so, please share with us by adding a comment down below.
Looking for other easy crafts to make, check out the Burlap Message Board! Its a perfect addition to any home office area with rustic French country or farmhouse style home decor.